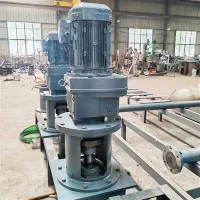
As a trusted supplier of Side Entry Mixers, I understand the importance of a proper installation process to ensure the optimal performance of these essential industrial equipment. In this blog post, I will guide you through the step - by - step process of installing a side entry mixer in a rectangular tank.
Pre - installation Preparations
1. Safety First
Before starting any installation work, it is crucial to prioritize safety. Wear appropriate personal protective equipment (PPE), including safety glasses, gloves, and steel - toed boots. Make sure the work area is well - ventilated and free from any potential hazards. Check the tank for any residual chemicals or substances that may pose a risk during the installation.


2. Review the Specifications
Thoroughly review the specifications of the side entry mixer and the rectangular tank. Ensure that the mixer is compatible with the tank's size, capacity, and the type of material to be mixed. The mixer's power rating, speed, and blade design should match the requirements of the application. You can find detailed information about our Side Entry Tank Mixers on our website.
3. Gather Tools and Materials
Collect all the necessary tools and materials for the installation. This may include wrenches, screwdrivers, welding equipment (if required), gaskets, bolts, and nuts. Make sure the tools are in good working condition and the materials are of the correct size and quality.
4. Inspect the Mixer and Tank
Inspect the side entry mixer for any damage or defects during transit. Check the tank for any irregularities in the mounting area, such as uneven surfaces or misaligned holes. If any issues are found, contact the manufacturer or supplier for guidance.
Installation Steps
1. Positioning the Mixer
Determine the optimal position for the side entry mixer on the rectangular tank. The position should be based on the flow pattern required for the mixing process. Generally, the mixer should be installed at an angle to create a swirling motion within the tank. Mark the mounting holes on the tank according to the mixer's flange pattern.
2. Mounting the Flange
If the tank does not have a pre - installed mounting flange, you will need to weld or bolt one onto the tank. Ensure that the flange is perfectly aligned with the marked holes and is level. Use a spirit level to check the alignment. If welding, follow the appropriate welding procedures and safety guidelines. After welding, clean the area to remove any welding spatter or debris.
3. Attaching the Mixer to the Flange
Place a gasket between the mixer's flange and the tank's flange to prevent leakage. Carefully align the mixer with the flange and insert the bolts through the holes. Tighten the bolts evenly in a criss - cross pattern to ensure a proper seal. Do not over - tighten the bolts, as this may damage the gaskets or the flanges.
4. Connecting the Shaft and Impeller
Attach the mixer shaft to the motor or gearbox. Make sure the connection is secure and the shaft is properly aligned. Then, install the impeller onto the shaft. The impeller should be tightened according to the manufacturer's specifications. Different types of impellers are available for various mixing applications, and you can learn more about our Industrial Agitators on our website.
5. Electrical Connections
If the mixer is electrically powered, connect the motor to the power supply. Follow the electrical wiring diagram provided by the manufacturer. Ensure that the electrical connections are properly insulated and grounded to prevent electrical hazards. If you are not familiar with electrical work, it is recommended to hire a qualified electrician.
6. Testing the Mixer
Before filling the tank with the material to be mixed, perform a test run of the mixer. Turn on the power and check for any abnormal noises, vibrations, or leaks. If any issues are detected, stop the mixer immediately and troubleshoot the problem.
Post - installation Checks
1. Visual Inspection
After the test run, visually inspect the mixer and the tank for any signs of damage or leakage. Check the tightness of the bolts and the alignment of the shaft and impeller.
2. Performance Evaluation
Fill the tank with the material to be mixed and start the mixer. Observe the mixing process and evaluate the performance of the mixer. Check if the mixing is uniform and if the flow pattern is as expected. If necessary, make adjustments to the mixer's speed or position.
3. Maintenance Plan
Develop a maintenance plan for the side entry mixer. Regular maintenance, such as lubrication, bearing replacement, and inspection of the impeller and shaft, is essential to ensure the long - term performance of the mixer. You can refer to our Side - entry Stirring Device page for more information on maintenance and troubleshooting.
Contact Us for Your Side Entry Mixer Needs
If you are in the market for a high - quality side entry mixer, we are here to help. Our team of experts can provide you with the right mixer solution for your specific application. Whether you need a standard mixer or a customized one, we have the experience and expertise to meet your requirements. Contact us today to start the procurement process and discuss your project in detail.
References
- Industrial Mixing Handbook, 3rd Edition
- ASME Boiler and Pressure Vessel Code, Section VIII